

Texture pop-in appears when the mip level a scene needs is not resident in local VRAM yet, so the engine shows a lower-resolution version while the missing data streams through storage, system memory, PCIe, decompression, and the GPU upload path. More VRAM helps because it keeps a larger texture working set local, but capacity is only one part of the failure. Upload latency and the engine’s streaming policy decide what the player actually sees.
Quick nav
- What Texture Pop-In Really Signals: A Residency Miss, Not Just ‘Low VRAM’
- Allocated, Used, Resident, Sampled: The VRAM Terms That Monitoring Tools Blur Together
- The Pop-In Timeline: From Missing Mip To Late Sharpness Snap
- Where PCIe Bandwidth Enters The Story, And Where It Does Nothing
- Why Ray Tracing And 4K Make Texture Streaming More Fragile
- How To Choose Texture Settings Without Guessing
- Two Real Failure Cases: RE4-Style Texture Budgets And Open-World Streaming Churn
- What To Measure Before Blaming The GPU, The Port, Or The SSD
- Sources
- Allocated VRAM is not the same as resident VRAM; a game can reserve memory without every high-detail mip being local and ready to sample.
- PCIe bandwidth affects recovery after a miss, not the quality of textures already sitting in VRAM.
- Ray tracing, 4K render targets, shadow maps, mods, and background apps all reduce the headroom available for texture residency.
- The safest texture setting is the highest one that leaves stable VRAM headroom during camera pans, scene cuts, and RT-heavy areas.
- High average FPS can still coexist with texture pop-in because streaming latency is a different bottleneck from shader throughput.
What Texture Pop-In Really Signals: A Residency Miss, Not Just ‘Low VRAM’
Texture pop-in is the visible symptom of a streaming system missing its preferred texture data at the moment the camera needs it. The common forum answer, “your GPU does not have enough VRAM,” is sometimes directionally right, but it hides the real mechanism. The useful phrase is VRAM residency: whether the texture mip the game wants is actually present in fast local GPU memory when the shader samples it.
Modern games rarely load every top-quality texture for an entire world at once. They stream mip levels based on camera distance, object importance, scene prediction, platform budgets, and memory pressure. A wall five meters away may need a sharp 4K or 2K mip; the same wall across a street can use a smaller mip. When the player sprints into a room, swings the camera across a dense market, or fast-travels into a new district, the engine has to promote some surfaces to sharper mips and evict others.
More detail in virtualized geometry model.
If that promotion arrives late, you see a soft sign suddenly gain lettering, a road texture snap into detail, or a character outfit sharpen one beat after the model appears. That is the core of the “vram residency texture pop in” problem: the renderer is capable of drawing the high-quality texture, but the correct mip was not resident soon enough.
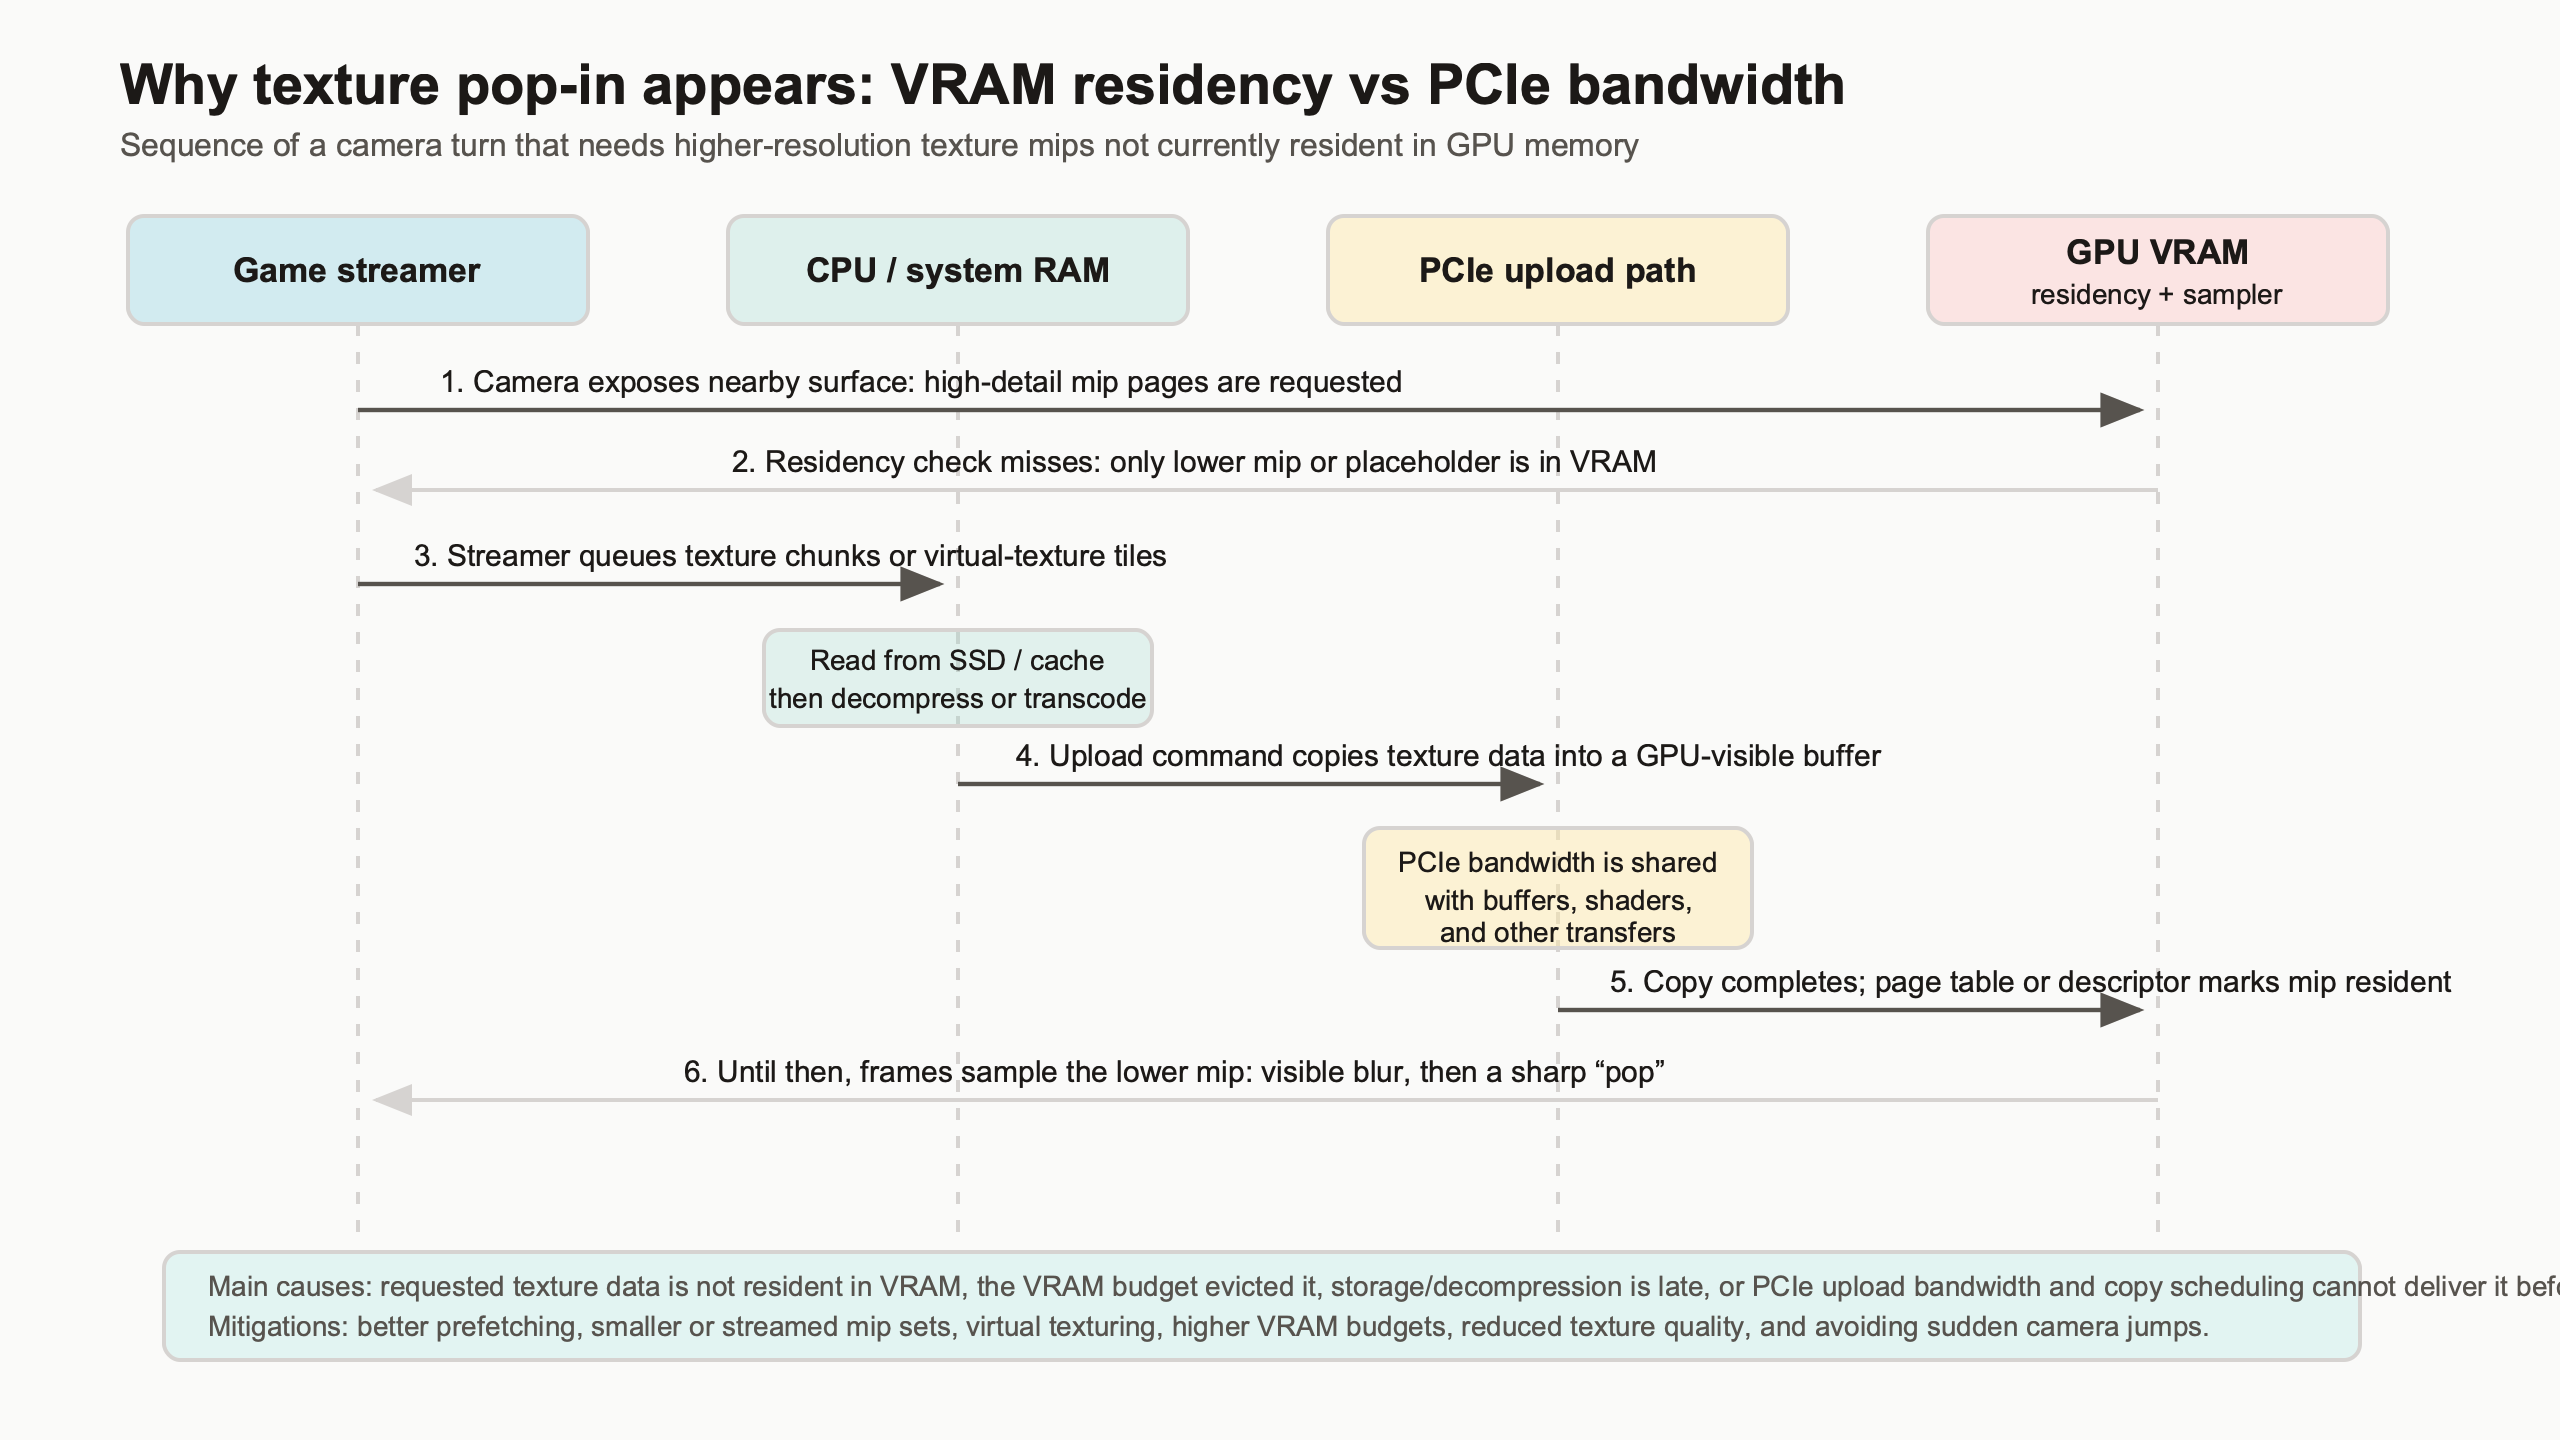
The diagram is useful because it separates the visible artifact from the hidden path. The player sees a low-detail surface, but the cause may sit anywhere along the route from storage read, decompression, upload scheduling, PCIe transfer, residency decision, and final sampling. Treating every case as “buy more VRAM” skips half of that chain.
Microsoft’s Direct3D 12 documentation describes residency as an explicit part of modern memory management, where applications and drivers must handle whether resources are resident before use. The official Direct3D 12 residency documentation is aimed at developers, but the player-facing lesson is simple: memory that is allocated or budgeted is not always the same as memory that is ready at the instant a frame needs it.
Allocated, Used, Resident, Sampled: The VRAM Terms That Monitoring Tools Blur Together
VRAM meters are useful, but they often compress several different ideas into one bar. A game may allocate memory, commit resources, keep some of them resident, and sample only a subset in the current frame. Pop-in happens in the gap between what the game intends to show and what is resident when the scene is drawn.
Allocated memory is memory the game or driver has reserved for resources. Committed memory is tied to real backing memory. Resident memory is currently present where the GPU can use it without pulling it in first. Sampled texture memory is the part actually read by shaders during the frame. A monitoring overlay may show a game near a 10 GB allocation, but that number does not prove every high-resolution mip is resident and being sampled.
I wrote about texture compression tradeoffs if you want to dig deeper.
This distinction explains why warning bars in PC ports can be confusing. A Resident Evil 4 Remake-style texture budget slider labeled “High 1GB,” “High 4GB,” or “High 8GB” is not changing the color precision of every surface. It is mainly changing how aggressively the engine can keep higher-resolution texture mips in its pool. The lower budget can still render the same scene geometry, lighting, and material setup, but it has less room to keep sharp mips around for nearby objects.
The same blur appears in open-world games. A VRAM overlay may report that an 8 GB card is “only” using 7.2 GB, yet the player still sees texture sharpening during traversal. That can happen because the workload is not just total memory. It is churn: how quickly new high-priority mips are requested, how often older ones get evicted, and how much upload work can be hidden before the player notices.
The Vulkan specification also treats memory allocation and residency-related behavior as explicit concerns, including memory heaps, memory types, and resource binding. The Vulkan memory allocation chapter shows why a single “VRAM used” number is a simplification rather than a full picture of what a renderer is doing.
The Pop-In Timeline: From Missing Mip To Late Sharpness Snap
A pop-in event usually starts before the player sees it. The camera turns, a new surface becomes important, the engine asks for a sharper mip, and the streaming system checks whether that mip is already resident. If it is not, the game either displays a lower mip, waits, causes a frame-time bump, or hits a harder failure under extreme pressure.
The timeline is easier to reason about as a chain:
| Stage | What the engine wants | What can go wrong | What the player sees |
|---|---|---|---|
| Camera demand | A nearby object needs a sharper mip | Prediction misses a fast pan, sprint, cutscene, or teleport | Surface appears soft at first |
| Residency check | The needed mip is already in VRAM | The mip was evicted or never loaded due to pool pressure | Late detail snap |
| Streaming request | Missing data is read and decompressed | Storage, CPU decompression, or copy scheduling falls behind | Soft textures persist for multiple frames |
| Upload path | Data reaches local VRAM before it is sampled | PCIe or upload queues are saturated by other resource transfers | Frame-time spike or delayed sharpness |
| Sampling | The shader reads the correct mip | The engine chooses to keep a lower mip to protect frame time | Stable but blurrier image |
This is why pop-in can appear on a GPU that is otherwise producing strong average frame rates. Shader throughput may be fine. Rasterization may be fine. The frame pacing problem comes from the resource stream, not from the GPU’s ability to shade the final pixels once the resources are local.
A clean capture plan should prove the timeline rather than argue from screenshots alone. Use a fixed route, a repeatable camera pan, and side-by-side captures at different texture budgets. For a 4K Resident Evil 4 Remake-style pass on a 12 GB GPU, the useful comparison is not just “High 1GB versus High 8GB looks sharper.” The useful output is screenshots, VRAM allocation, estimated budget headroom, and 1% low frame-time behavior during the same movement.
Where PCIe Bandwidth Enters The Story, And Where It Does Nothing
PCIe bandwidth matters after a residency miss because missing texture data has to move into VRAM before the preferred mip can appear. PCIe does not make already resident textures sharper. Once the correct mip is in local graphics memory, the GPU samples it through its own memory subsystem, where local VRAM bandwidth dominates.
This distinction clears up a lot of bad upgrade advice. A graphics card on a narrower or older PCIe link can still draw a scene normally when its working set fits in local VRAM. The penalty shows up when the game has to recover from misses, upload new streaming data, or move resources under pressure. The player-facing symptom can be a longer delay before full detail appears, not always a lower average FPS number.
PCI-SIG’s official material for PCI Express 4.0 states that PCIe 4.0 doubles the per-lane transfer rate of PCIe 3.0. That specification matters for upload recovery, especially on cards wired as x8 instead of x16, but it does not change the texture quality setting by itself. The high mip is either resident and sampled, or it is not.
A good diagnostic test is to compare the same traversal under a bandwidth-limited mode when the platform allows it: PCIe Gen3 x8 versus Gen4 x16, for example. The expected measurement is not “the screenshot is lower quality on PCIe Gen3.” The expected measurement is “the low mip remains visible longer after a fast camera pan” or “copy activity lines up with frame-time spikes.” GPUView, PresentMon, PIX, RenderDoc, or Nsight Graphics can help line up the frame where the player sees the snap with the resource upload activity around it.
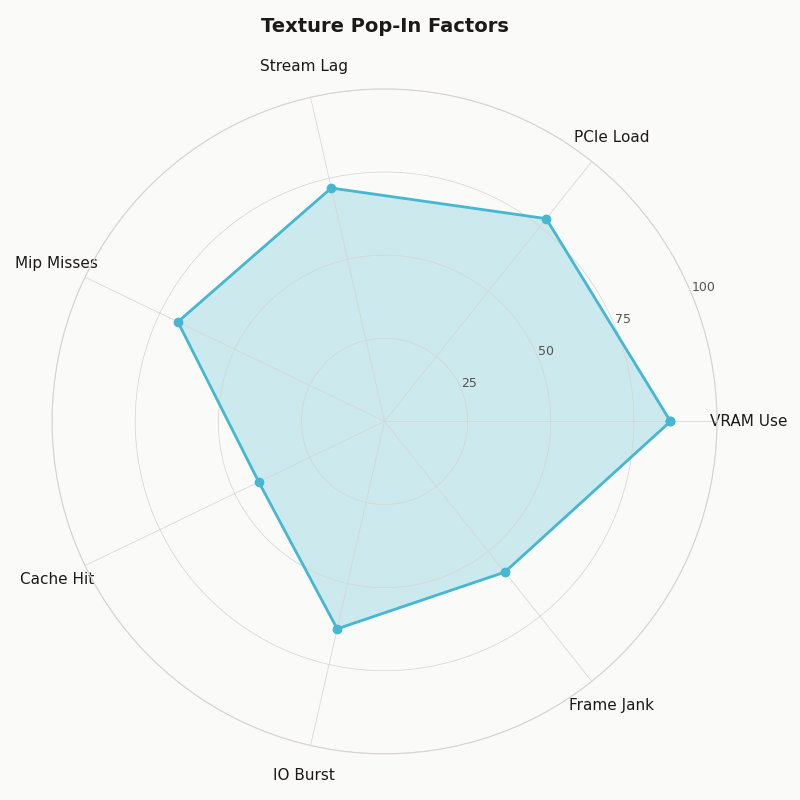
Multi-metric comparison — Texture Pop-In Factors.
The radar chart frames the issue correctly: VRAM capacity, PCIe bandwidth, storage behavior, engine prediction, decompression, and user settings all push on the artifact. A card with enough raw shader performance can still score poorly on pop-in risk if the texture pool is overfilled and the engine keeps missing its prediction window.
Why Ray Tracing And 4K Make Texture Streaming More Fragile
Ray tracing and 4K raise the pressure on residency because they consume memory that textures would otherwise compete for. Higher resolution needs larger render targets and often higher-quality shadows. Ray tracing adds acceleration structures and can change the set of resources the game wants to keep close. The texture pool is not alone in VRAM.
NVIDIA’s DirectX Raytracing resource material explains that acceleration structures are GPU resources used to represent geometry for ray traversal. Those structures have memory cost, and that cost is paid alongside textures, buffers, render targets, post-processing history, and driver allocations. On a 12 GB card, enabling RT can move a borderline texture setting from “mostly safe” to “pop-in during movement.”
If you need more context, DXR raytracing costs covers the same ground.
AMD’s public RDNA and Radeon product pages tell the same story from the hardware side: local memory capacity and bandwidth are finite, even on high-end cards. An RX 7900 XT with 20 GB has more room for resident assets than an 8 GB card, but an engine can still create streaming churn with ultra textures, heavy RT effects, large mod packs, and high-resolution output.
The practical rule is not “turn RT off because textures matter more” or “lower textures because RT is expensive.” The rule is to decide which resource pressure matters in the scene you actually play. A competitive shooter at 1440p may benefit more from stable frame pacing and medium textures than from a larger pool that risks spikes. A slow single-player game at 4K may tolerate a lower frame rate if it keeps texture detail stable during exploration.
Mods make this sharper. A 4K texture pack for a PC port can multiply the size of popular surfaces while leaving the engine’s prediction logic largely unchanged. The mod may look excellent in still screenshots, yet create visible late mip upgrades during fast movement because the working set no longer fits the assumptions the streaming system was tuned around.
How To Choose Texture Settings Without Guessing
Choose the highest texture setting that leaves stable VRAM headroom in the heaviest scene you actually play, after resolution, ray tracing, shadow quality, mods, frame generation buffers, capture tools, browser tabs, and the OS have taken their share. The right setting is workload-specific, not a moral score for your GPU.
Use a repeatable decision framework: raise textures until pop-in appears, VRAM warnings become persistent, or frame-time spikes line up with streaming events. Then step down one tier and retest the same route. Average FPS alone is not enough; 1% lows, visual stability, and repeatability matter more for this issue.
Related: budget upscaling choices.
| GPU | VRAM capacity | Memory bandwidth | PCIe interface | Texture pop-in risk profile |
|---|---|---|---|---|
| NVIDIA GeForce RTX 3060 12GB | 12 GB GDDR6 | 360 GB/s | PCIe 4.0 x16 | Good capacity for 1080p/1440p texture pools, but older GPU speed and RT load can still expose streaming stalls. |
| NVIDIA GeForce RTX 4060 Ti 8GB | 8 GB GDDR6 | 288 GB/s | PCIe 4.0 x8 | More sensitive to ultra textures, RT, and 4K packs; PCIe x8 can make recovery from misses more visible on older platforms. |
| NVIDIA GeForce RTX 4070 Ti 12GB | 12 GB GDDR6X | 504 GB/s | PCIe 4.0 x16 | Strong 1440p profile; 4K ultra plus RT can still crowd texture residency in demanding ports. |
| AMD Radeon RX 7900 XT 20GB | 20 GB GDDR6 | 800 GB/s | PCIe 4.0 x16 | Large headroom for high-resolution texture pools and mods, though poor engine streaming can still produce late mip snaps. |
| Source and method | Specifications checked against public NVIDIA and AMD product pages available by May 10, 2026. The risk profile compares capacity, local bandwidth, PCIe wiring, and common 1080p/1440p/4K gaming workloads; it is not a benchmark result. | |||
The table shows why “8 GB versus 12 GB” is too blunt. The RTX 3060 12GB has more capacity than an RTX 4060 Ti 8GB, while the 4060 Ti is newer and faster in many rendering paths. For texture residency, that extra 4 GB can matter in heavy pools, but it does not automatically solve RT cost, engine prediction, or upload timing. The RTX 4070 Ti 12GB has the same listed capacity as the RTX 3060 12GB but far higher local memory bandwidth and GPU throughput. The RX 7900 XT’s 20 GB gives it more room for high-resolution assets, yet even that does not make a badly tuned streaming system invisible.
For 8 GB-class cards, start by treating ultra texture settings as conditional: acceptable at 1080p or some 1440p games, risky with RT, 4K, and large mods. For 12 GB cards, high textures are often realistic at 1440p, but RT and 4K can still require compromise. For 16 GB and 20 GB cards, capacity stops being the first suspect more often, so look harder at engine behavior, storage, shader compilation, and platform-specific port issues when pop-in persists.
Two Real Failure Cases: RE4-Style Texture Budgets And Open-World Streaming Churn
RE4-style texture budget sliders are a clean example because they expose the pool idea directly: higher settings let the engine keep more high-resolution texture mips resident. Open-world games show the harder version of the same problem, where camera motion and traversal constantly change the working set.
RE4-style texture budgets
When a game presents options such as “High 1GB,” “High 4GB,” and “High 8GB,” read them as residency budgets, not magic quality switches. At the lower setting, the engine is more likely to keep lower mips around and delay sharper mips until they are needed. At the higher setting, more high-detail texture data can remain local, which reduces late sharpening if the rest of the system can keep up.
The correct test is a controlled capture: same save point, same resolution, same RT state, same camera path, same restart procedure. Compare nearby signs, cloth, wall posters, and ground textures across the three budgets. Record VRAM headroom and 1% lows. If High 8GB improves still-image detail but creates frame-time spikes with RT on, High 4GB may be the better play setting even on a card with more than 8 GB of VRAM.
Open-world and Unreal-style churn
Large traversal games add prediction risk. The player can turn 180 degrees, sprint into a new biome, enter a vehicle, or hit a streaming gate that swaps asset sets quickly. Unreal Engine’s virtual texturing documentation describes a system where texture data can be broken into smaller pages and streamed based on visible demand. The official Unreal Engine Streaming Virtual Texturing documentation is developer-facing, but the player-facing idea is clear: engines try to avoid loading full textures when only parts or lower mips are needed.
That approach can greatly reduce waste, but it also creates visible failure modes when prediction, bandwidth, or budgets fall behind. A city street may look crisp while walking forward, then show soft storefronts after a quick spin because the new view needs different texture pages. A console version may hide this with fixed hardware budgets and aggressive tuning, while a PC version has to survive dozens of GPU capacities, PCIe modes, storage speeds, driver versions, and user-selected texture packs.
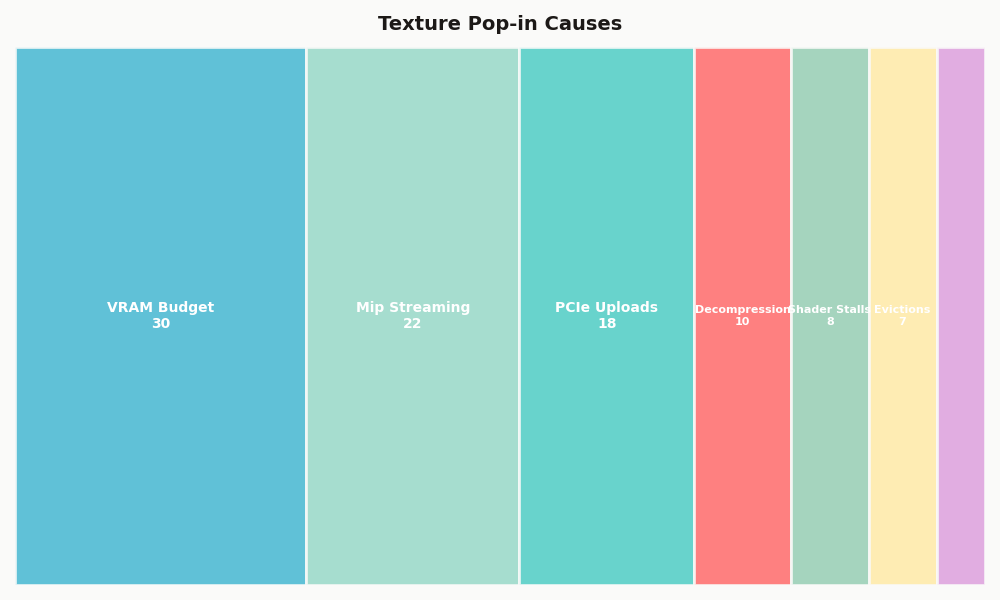
Share of each category in Texture Pop-in Causes.
The breakdown helps explain why two players can report different results in the same game. One system may be limited by capacity, another by upload recovery, and another by a texture pack that changes the working set. The artifact looks similar on screen, but the fix differs.
What To Measure Before Blaming The GPU, The Port, Or The SSD
Before blaming one component, measure the event. Texture pop-in should be tested with repeatable movement, screenshots before and after the snap, VRAM headroom, frame-time data, and some view of upload or copy activity. Without that, forum advice turns into slider folklore.
Use a simple capture plan. Pick one save point or benchmark route where pop-in is easy to trigger. Run it once at your current settings, once with textures one tier lower, once with RT off, and once at a lower output resolution. Keep the camera movement as close as possible. The goal is not lab-grade certainty; it is isolating which change reduces the artifact.
See also shader throughput limits.
If lowering textures fixes the issue while FPS barely changes, residency pressure was the likely cause. If turning RT off fixes it at the same texture setting, RT memory cost probably stole the headroom needed by the texture pool. If lowering resolution helps, render targets and post-processing history may have been crowding the budget. If none of those changes help but the artifact happens at the same world boundary every time, the engine or port may be the main suspect.
For deeper testing, align visual captures with frame-time traces. PresentMon can show frame pacing, while GPUView, PIX, RenderDoc, and Nsight Graphics can expose more detail about GPU queues, resource activity, and sampled textures. RenderDoc and Nsight are not necessary for most players, but they are useful for reviewers, mod authors, and technical analysts who want to prove whether a visible snap is a mip transition rather than a lighting or shader compilation issue.
A compact evidence package for a public claim should include three screenshots from the same camera position, a short clip showing the snap, the texture setting and RT state, VRAM headroom from the same run, and frame-time data around the event. If the claim involves PCIe, include the platform link mode and repeat the same route under the alternate mode. That gives readers something testable instead of a one-game prescription.
The practical takeaway is direct: texture pop-in is not a verdict that your GPU is bad, and it is not always fixed by buying more VRAM. It is a residency miss made visible. More capacity increases the odds that the right mips stay local; more PCIe bandwidth can shorten recovery when they do not; better engine streaming can hide the miss or avoid it. Pick settings by preserving headroom in the scenes you play, not by chasing the largest texture label your menu allows.
Sources
- Microsoft Direct3D 12 residency documentation
- Microsoft Direct3D 12 memory management documentation
- Khronos Vulkan specification: memory allocation
- Epic Games Unreal Engine documentation: Streaming Virtual Texturing
- PCI-SIG PCI Express 4.0 frequently asked questions
- NVIDIA DirectX Raytracing resources
- NVIDIA GeForce RTX 3060 product specifications, NVIDIA GeForce RTX 4060 Ti product specifications, NVIDIA GeForce RTX 4070 Ti product specifications, and AMD Radeon RX 7900 XT product specifications